Design Inspiration for My New Place

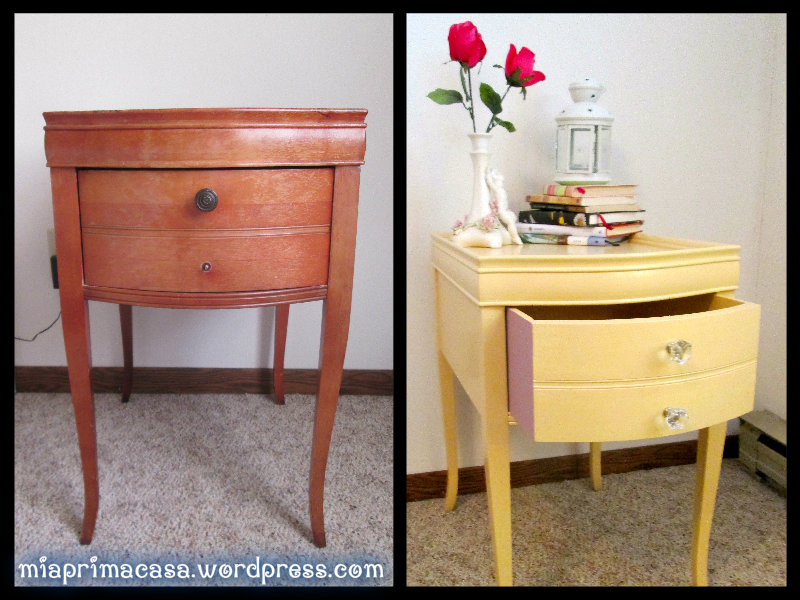
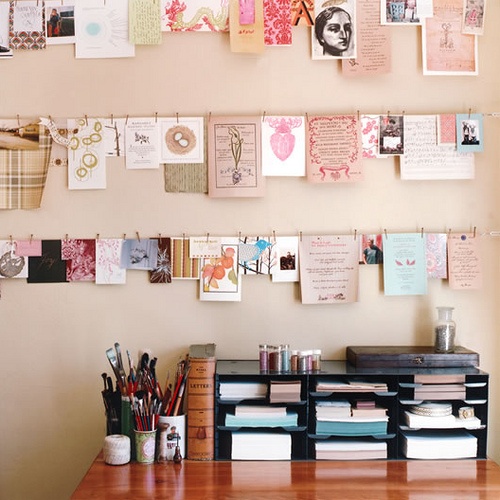
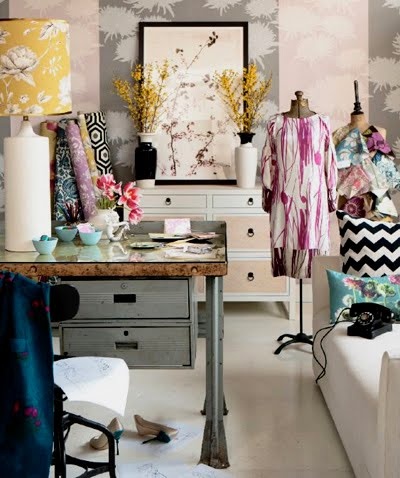
Just about a year ago, I was moving into my first place and starting this blog (in Italian, “la mia prima casa” means my first house) to catalog my adventures. This week, my sister and I are moving into our second place. When we first moved, we wanted an eclectic, comfortable space, but faced the problems of living in an old house (bad trim, wall colors that didn’t fit our palette, and an outdated kitchen). Our second place is newer and lighter, with higher ceilings and a modern look. Our new decor inspiration is open, comfortable, and a mix of patterns with pops of bold colors. Below are my favorite inspiration images for my newest place.

a2d200618ed0f072ddcf3e56993cdc4d7e6b74c6a1aaa934249693e827f2d9f69723d18ac95401563ea66e6681ddf8ebf154e8a7ede21a7bedd8ebc9d1316a446a4281511f6ae94a3837e205fba7fc644cc9cc32407811c05d43222cde20eb37

Can’t wait to start the decorating process anew!

Ciao,

Sarah

How to Clean Makeup Brushes (Because You Know We All Should More Often…)

How to Clean Make Up Brushes

The simplest way to clean makeup brushes, including foundation, concealer, eyeliner, and eye shadow brushes, is to use baby shampoo. Simply wet the hairs of the brush in warm water then gently massage baby shampoo into the hairs. Depending on how long it’s been since your last brush cleaning, you may need to repeat a few more times. Once you are done cleaning, gently dry the brush with a paper towel. Then set the brush on a paper towel to dry. You may also need to reshape the hairs. Let dry completely before using.

How easy is that?

Essential Beauty Supplies has an easy step-by-step of this process as well.

Ciao!

Sarah

How to Clean a Sheepskin Rug

My aunt gave my sister and me this beautiful sheepskin shag run from the 70s when we moved into our new place. It has been sitting in my grandma’s garage…and needless to say, needed a serious bath. Our rug isn’t actually the skin of the sheep, but has the hairs attached to a fiber, so the washing process may be different for your own sheepskin rug. As always, if there are washing directions on your rug, follow those above all else. Ours was lucky enough to have instructions still attached, so I’ll walk you through the process. Dirty and smelly to say the least but worth it for a beautiful addition to our living room!

Sheepskin Rug BeforeBefore

Brush with Dog Brush

1. Brush out the rug with a dog brush. Also gently vacuum (particularly important if the rug has been sitting in a garage for twenty years…).

Brush the Rug

Already looking better!

Wash the rug with baby shampoo2. Wash the rug in lukewarm water in the bath tube. Add a capful of baby shampoo if the rug needs a deeper clean.

3. Rinse off the soap with cold water and let the rug drain in the tub (we waited about an hour).

4. Transfer the rug to a drying rack and lie flat to dry.

5. When completely dry, lay out the rug and brush again.

How to Clean a Sheepskin Rug- After

After.

Looks beautiful and is so soft. It’s a great addition to our living room.

Re-Painting an Old Nightstand with Pops of Color

RePaint an Old Dresser

My aunt and uncle generously gave my sister and me some old furniture of theirs for us to use in our new apartment. This sweet little nightstand was one item they gave us. I loved the shape and size of the night stand but wanted to update it with a fresh look.

Some furniture re-painting tips:

Use a primer. Generally, I use two coats for each piece of furniture.

Always sand before painting. In fact, you should sand between each coat of paint as well (yes, even after your first coat of color). Sanding between coats will give your piece a more professional and neat look.

Add a pop of contrast! For this night stand, I’ve added the pop on the side of the drawer. It’s only visible when you open it, but I think it’s a nice touch that elevates the paint job and add some additional interest.

Re Paint an Old DresserPainted Night Stand on miaprimacasa.wordpress.com

Do you have any furniture re-painting tips?

Ciao!

Sarah

Chewy Granola Bars- Wrapped with Love!

Chewy Granola Bar Recipe

The other day I posted a recipe for delicious homemade chewy granola bars. Yesterday, I shared the recipe with a friend, who made the granola bars for her boyfriend. I loved how she wrapped them (she was sending them through the mail)! What’s even better is how much that adorable twine cost…just a dollar at Target.

I think these granola bars make a healthy alternative to sending cookies. What are some other ideas for delicious, healthy treats?

Ciao!

Sarah

J.crew DIY Denim

JcrewDYIDenim2

JcrewDYIDenim

J.crew has some unique DIY denim styling ideas, including my favorite: DIY patchwork monogram and patch-pocket fading. I’m up for giving the patchwork monogram a try one of these days, but in case you aren’t so inclined to spend time on these looks, here are some great store-bought alternatives. View all of J.crew’s DIY denim ideas here.

AE Colorblock Denim

Colorblock Denim Wester Top, now $39.99 at American Eagle Outfitters.

il_570xN.428688915_me0i

90s Denim and Gingham Top, $30 at vauxvintage on Etsy.

My New Kitchen! How to Modernize an Outdated Space

My New Kitchen: How to Modernize an Outdated Space

For about six months, my sister and I attempted to decorate our new apartment around the free furniture we had received from family. At some point, we realized that we wanted to take our decorating to a more sophisticated level, i.e. not a clearly twenty-something pad filled with hand-me-down furniture. The kitchen space was the most troubling for us thanks to the outdated flooring, cabinetry, and trim. Our solution? A large rug that set off our eating space from our cooking space, a modern table (Ikea), pops of red (sleek Target chairs and three red candles did the trick), and a Matisse print. We focused our color pallet on just three maine colors: black, red, and blue to make the space look clean and modern. The transformation clearly works, since I’ve found myself cooking more and spending more time in the kitchen than I had before!

My New Kitchen: How to Modernize an Outdated Space My New Kitchen: How to Modernize an Outdated Space

Total Cost: $298.98

Chairs- $79.99 for a set of two at Target

Table- $179.0 at Ikea

Rug- $79.99 at Target

Coat Rack- $29.99 at Ikea

Red votive candles- $10 at Target

What are your suggestions for modernizing an outdated space?

Ciao!

Sarah

Homemade Granola Bar Recipe

Homemade Granola Bar Recipe on miaprimacasa.wordpress.com

I can’t totally take credit for this recipe; I got it from a coworker after trying a batch of his. I did modify the recipe to fit my own tastes (substituting flax seeds for chia seeds and adding a bit more peanut butter and less honey). A great thing about this recipe is that there really is no limit to its variations. I decided to make my own granola bars instead of buying them because I not only wanted to save a bit of money, I also wanted to control exactly what I was eating in this snack. I always had trouble identifying store-bought granola bars that were truly healthy (“Is this more like a candy bar than a granola bar? What does whole wheat really mean in this bar?”). With my own homemade granola bars, I know exactly what I’m getting!

Granola Bars

2 Cups Quick Oats

1 Cup Protein Powder

1 Cup Chia or Flax Seed

1 Cup Dried Cranberries

1 Cup Dark Chocolate Chips

Mix the above ingredients in a bowl, then add:

1 1/2 Cup Natural Peanut Butter

1/2 Cup Honey

Press the mixture into a 9X13.

Depending on how crazy I get with the chocolate chips or cranberries, I’ll add in extra peanut butter or honey to firm up the mixture.

Store in the fridge to help keep from crumbling.

Hope you enjoy as much as I do!

Ciao!

Sarah

Lined Zip Clutch Tutorial

I found the pattern and tutorial for this charming little clutch at Charm Stitch. I modified the original pattern by increasing the pattern size by two inches and choosing not to decorate my bag with drawings (I let the corduroy and contrasting vintage floral lining do all the talking).

I don’t recommend this project for beginners who have not worked with zippers yet, but if you feel up to the challenge, I suggest trying a sample bag first before working on your final piece.

Zip Clutch Tutorial- miaprimacasa.wordpress.com Zip Clutch Tutorial- miaprimacasa.wordpress.com Zip Clutch Tutorial- miaprimacasa.wordpress.com

My biggest piece of advice is to be patient, use a zipper foot, and backstitch wherever it makes sense for security (I’d like think this bag will get thrown around and used quite a bit!).

Have you tried the tutorial out yourself? Pass along your thoughts or suggestions below!

Ciao,

Sarah

Related Posts

Lined Sequin Clutch with Zipper: a tutorial at Sweet-Verbena.blogspot.com

Fold-Over Clutch Tutorial at Fabandmade.blogspot.com

DIY: Leather Fold Over Clutch at SayYestoHoboken.com

Kitchen Redo: Pops of Red, a Bold Rug, and a Sleek Table

Kitchen Redo-Blue & RedKitchen Redo- Blue & RedHere’s a sneak peak of my newly redecorated kitchen (homemade Italian dinner and all! Get the recipe for the parmesan chicken here.). I was a bit skeptical when my sister suggested this rug, but I think it corners off the seating area nicely and has made our meals more comfortable and enjoyable. The chairs are not the right ones yet, but our new red chairs should be coming in soon (will update with pictures when complete!).

Ciao,

Sarah